How to create browser extension. Part 1: idea, planning, execution
In the first part of the article, I will share how the idea came to me and what challenges I faced while developing the app.
The second part will uncover the whole process of publishing and marketing extension.
The Idea
It all started on a regular day when I and my team were in a meeting with the client. Nothing special.
And here came the time to schedule another meeting. What could go wrong? Well, something could.
People at the meeting were split between 3 continents and syncing meeting time turned out to be heavy lifting. Long story short, we didn’t manage to find a time that works for everyone and decided to do it offline.
I’m not typically the one who schedules meetings, but I felt that it was a super easy task.
But it’s fair to say that, probably, without the right tools, it could be hard to do on the fly.
That seemed like an obvious problem to me. And I decided to come up with a tool to simplify this process.
Planning work
The first step for me was to figure out which form of the app would work.
Browser extension was a perfect fit.
Why?
- easy to use
- simple to implement
- users don’t waste time and lose context switching tabs
Win-win for both users and me.
Next, I highlighted core features, that make the app useful. The list was pretty short:
- Select timezones
- Select the date and time
- Easy scheduling for a new meetings
And now it has come to the point where I finally can write some code, thank you.
Development process
I have never worked on an extension before, so the easiest way for me was to find the boilerplate on GitHub and see how it goes.
There were 2 options:
- https://github.com/Jonghakseo/chrome-extension-boilerplate-react-vite
- https://github.com/timelessco/react-vite-chrome-extension.
I liked the second one better because it’s simpler. And I didn’t want to dive into complexity right away.
The structure of the extension project is the same as any React app. You call createRoot to embed the root component into the HTML and build your app inside the root component.
Once I scanned through the repo I dove right into implementing features.
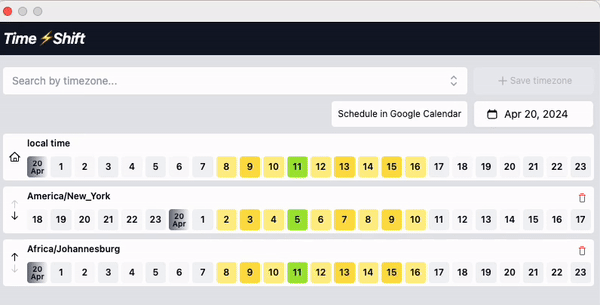
Date and timezone selectors
These were pretty simple.
I pulled in shadcn/ui, which has a Date Picker and a Combobox.
But there was one little detail, that made me spend time.
I was not able to use the Combobox component using the keyboard. After some time of trying to make it work, I gave up.
The solution for me was to add headlessui Combobox component.
Date picker
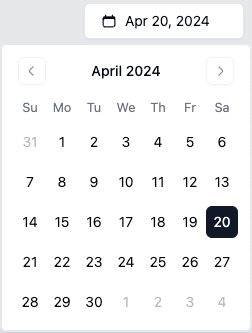
!! always try to be consistent in bigger projects !!
Timezones data
As a data source for the timezone selector, I picked the official TZ database https://en.wikipedia.org/wiki/List_of_tz_database_time_zones.
I downloaded the data and put it into the JSON. This allowed me to not depend on 3d party APIs.
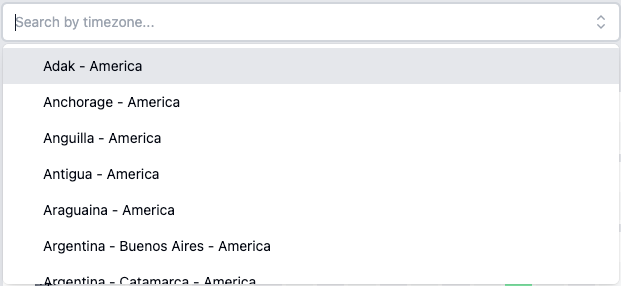
Timezone selector with the data
Persisting user's selection
I wanted to save the user’s choice across the sessions.
But here came the problem.
I wanted to use localStorage for that, but there is no localStorage in the extension environment.
There is a special, chrome storage there.
I wanted to make it easier and faster to implement, so I went on github to look up something related.
And there I stumbled upon a framework for extensions called Plasmo.
It has a nice API around chrome. storage, which looks like this:
const [value, setValue] = useStorage("value-key")
The framework generally has had a lot of cool features and tools that looked promising.
So I decided to give it a big try.
I moved all the components and packages to the new Plasmo project. Took me around 15 mins to clean everything up.
This migration allowed me to persist user's selection with ease and the new framework is powerful.
The next thing in line was a feature with the choice of time of day.
Time selection, drag-to-select
For this one, I picked a cool package https://github.com/AirLabsTeam/react-drag-to-select which allows you to select elements the way the user used to.
I created a row of 24 hours and added the selection to that. Here is how it looks:
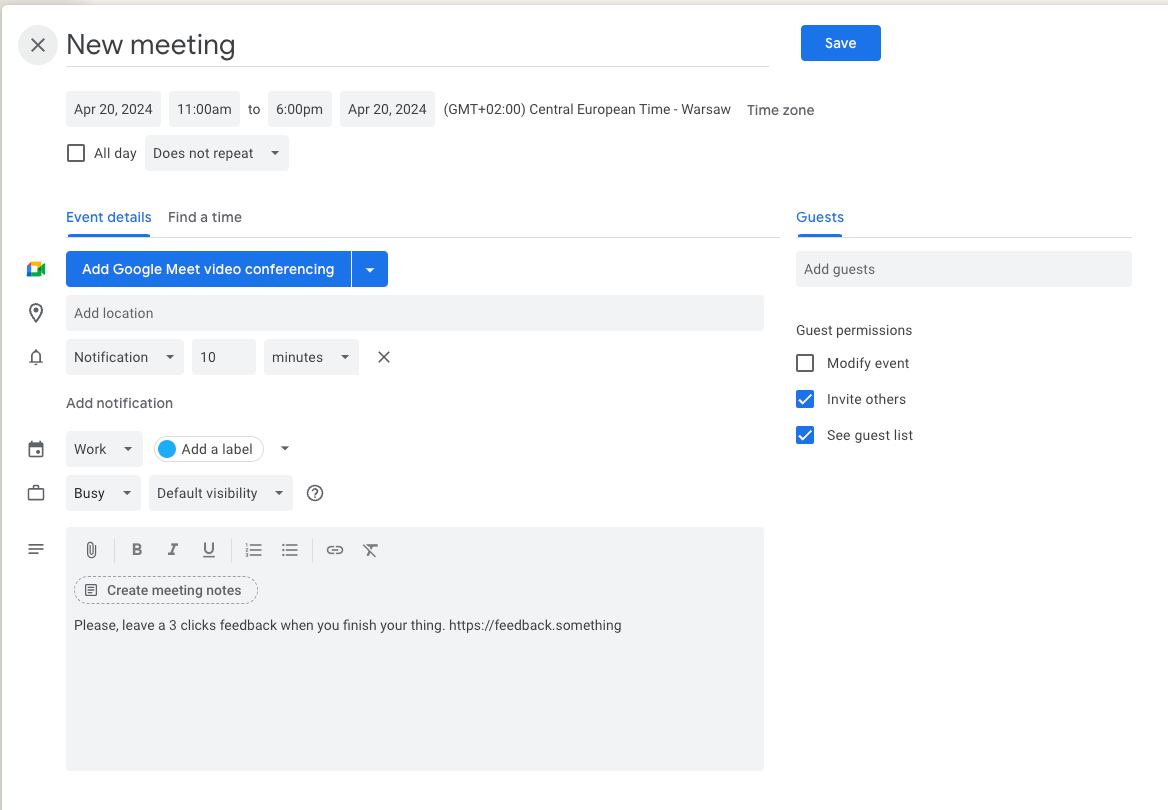
Creating a meeting
Later I added a “Schedule in Google Meet button”, which opens up a prefilled Google calendar event with the selected date and time. To do that you pass a query params to a crecial link:
https://calendar.google.com/calendar/u/0/r/eventedit?<params>
You can pass such parameters as text for meeting name, details for meeting details, dates to determine start and end time of the meeting and you could also pass ctz, if you want to specify the timezone.
Other
In addition to that, a lot of work has been done around the Date object.
- Convert local time into timezone time
- Correctly shift times on the UI
- Make sure it handles winter and summer time correctly
I managed to do that with 100% web APIs. It has really powerful features you can leverage in your projects as well.
Conclusion
The MVP was pretty much ready. The whole process took me about 2-2.5 weeks. I worked on this thing every other day for 1-2 hours and a bit more on the weekends.
Despite having some difficulties along the way, I managed to do what had been planned. And learned a lot about how to create a browser extension.
It's crucial to plan your work and set deadlines for the work. It will help you finish the plan and not get lost along the way. Especially if you are a developer. We are tent to build features without knowing if users would like it!
Tools and frameworks are important, especially when you want to solve problem fast.
In the second part, I will share the rest of the process, which is designing specific assets and publishing the app to the Chrome and Mozilla stores.
A few words about the Plasmo framework
Plasmo was a 💯 choise!
They have an impressive number of templates with integrations with services like Stripe, Supabase, Firebase, and Google Analytics.
With that, you can build your own SaaS in the extension pop-up.
You can easily build extensions for any browsers: chrome, safari, and Mozilla.
The dev server is not that fast, but it’s fine.
You can deploy your extension using a platform called Itero. Plasmo-Itero pair is the same as Next.js-Vercel.
And the same as Vercel, it's quite expensive. You can deploy 1 app for free thought.